With custom controls and backgrounds, Native Instruments Kontakt allows you to create your own graphical user interface (also called GUI). When applied correctly, your instruments become more personal, playable and user friendly. This tutorial takes you through the steps required to create a background wallpaper and a custom graphical control in Kontakt. Along the way you’ll be learning to use the KSP script editor to apply the graphical elements and assign the custom knob to an internal control within the Kontakt engine.
Background wallpaper image
The custom user interface is not just something you can draw up inside Kontakt. It is a combination of:
- A background image – also known as a wallpaper
- A number of additional graphical elements (knobs, faders and buttons) placed on specific positions on top of the background
- An action for each of these controllers
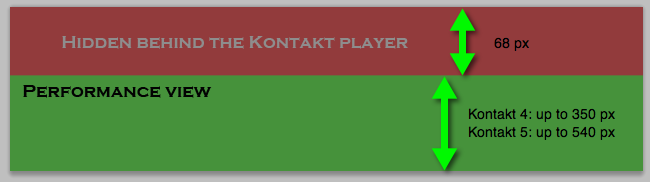
The background image should have a width of 633px and any desirable height between 68px (the height of the Kontakt instrument itself) and 608px (418px for Kontakt 4 and earlier). As an example, let’s create a background image in an image editor. Set the height to 164px and the width to 633px. Set the resolution to 72px/inch resolution.
Assign the background to your instrument
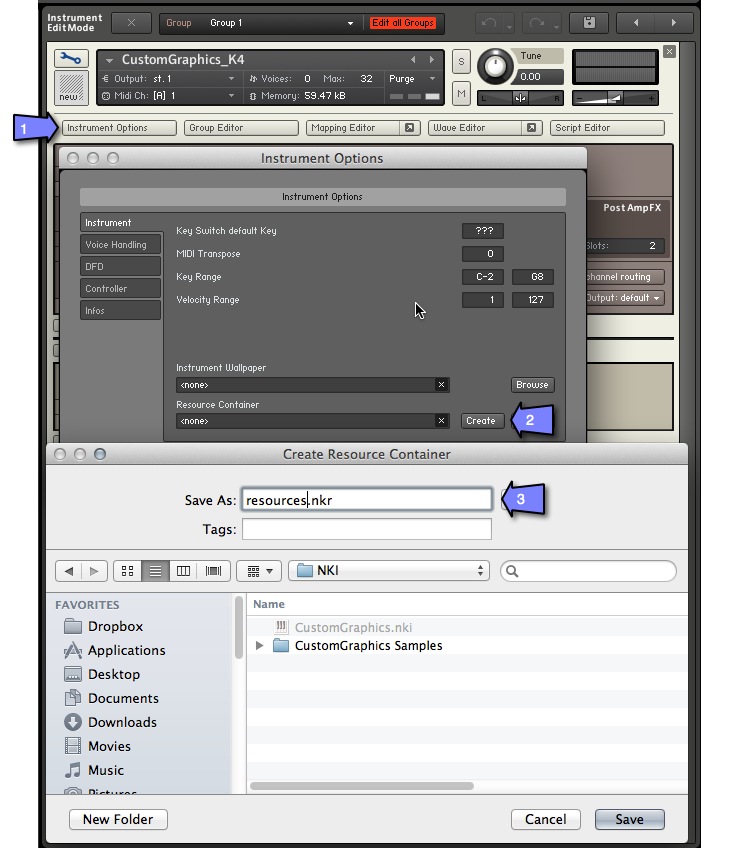
Now, locate your Kontakt instrument in your file browser. The Kontakt instrument has an ‘.nki’ filename extension. There are two ways to assign the image to the instrument. One way involves setting the path in the Instrument options, the other involves addressing it via script. We’ll be using the latter in this tutorial. In order for us to be able to access the path to the image via script, we need a Resource container. Please create one like this:
- Open Instrument Options and click ‘Create’ next to the Resources container field
- Provide a name for the resources container (for example ‘resources’)
- Save it in the folder where your .nki instrument file is
Accept to create a folder structure by clicking Yes
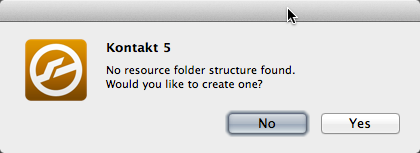
Kontakt will inform you that no picture, impulse response sample or script files have been added. Just click OK again.
You will notice that the Resource selector field now points to the resurces.nkr file, but it also says ‘(Read from the “Resources” folder)’.
This is just to inform you, that you now have a valid resource-file which could contain resources such as script files, other pictures and some IR-samples, but since a Resources folder structure now also exists, this will take precedence over the resource-file. This allows you to easily work with such resources directly in the folder structure without having to generate a new resource-file every time you change an image file etc.
Click ‘Close’, and do not expect to see your background applied just yet 🙂
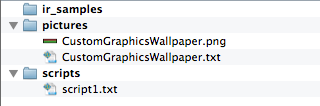
You need to copy or move your background image to the pictures folder inside the Resources folder. Create an additional plain text file in the pictures folder. The file should have the same name as the image, just ending in ‘.txt’ instead of ‘.png’. The contents of the file should be like this:
Has Alpha Channel: no
Number of Animations: 0
Horizontal Animation: no
Vertical Resizable: no
Horizontal Resizable: no
Fixed Top: 0
Fixed Bottom: 0
Fixed Left: 0
Fixed Right: 0
Such text files accompany any image file to be used in Kontakt – although the content may of course vary.
The script for assigning the wallpaper looks like below. I recommend using a simple text editor (such as Notepad++ for Windows or TextWrangler for Mac – both are free and offers significant improvements over the standard text editors that come with either Operating system). You may also find Nils Liberg’s dedicated KSP editor/compiler very useful. It’s also free. Unfortunately the Mac port does not run so well, so I haven’t used it much myself. Save the script as script1.txt in the scripts folder inside the Resources folder.
on init
    make_perfview
    set_script_title("Wallpaper")
    set_ui_height_px(96)
    set_control_par_str($INST_WALLPAPER_ID,$CONTROL_PAR_PICTURE,"CustomGraphicsWallpaper")
end on
The Resources folder structure should now resemble this:
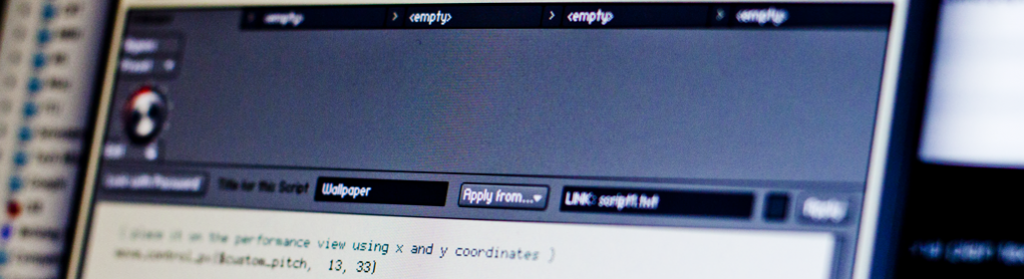
With this in place, it’s time to go to the Script editor so we can implement the graphics. Open the script editor and enable editing like this: 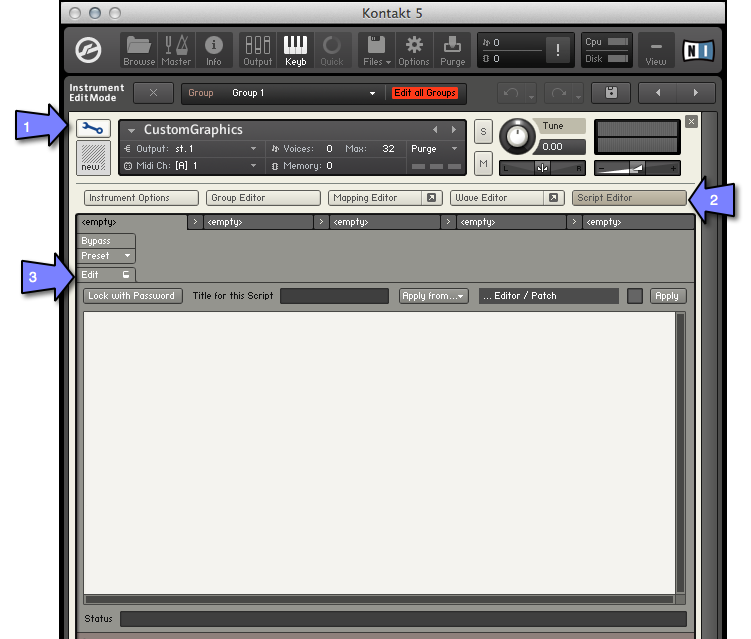 What you see here is a blank script. Each of the “<empty>” tabs represent a script, so as you can see, it’s possible to have 5 different scripts running at the same time, for each instrument. Since we are not using the internal editor for maintaining the script, you need to tell Kontakt to apply the script from the Resources folder. Do this by clicking “Apply from…” and select “Resources folder” -> “script1“. The Apply lamp will now glow, indicating that you have unapplied changes. Click the Apply button to effectively apply the script.
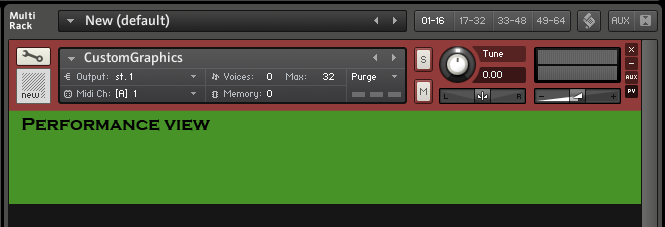
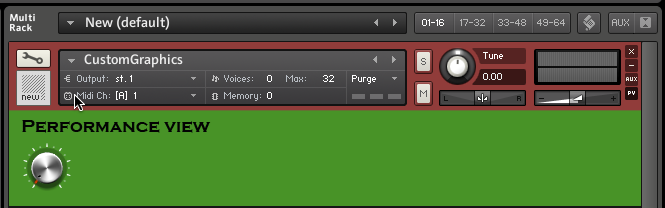
With the example image I created, the instrument now looks like this – very beautiful, right?
Create a custom button
Next we need a custom knob. The knob itself is an image file, consisting of all the individual ‘frames’ that make up the entire animation (moving the knob from its minimum position to its maximum position). Sure you can make this yourself, but since I’m a lazy guy, what I’ve been doing is to go to the knobman gallery and just pick the knob I wanted – there are plenty to choose from. There’s also an excellent online knob generator, so if you’re into that kind of work, you can easily create your own knob using this tool. Either way, what you’ll end up with should be a .png image file consisting of say 101 frames below each other, starting with the minimum position as the first (uppermost) frame. As an example, here’s a rendered version of one of the free knobs from the gallery.
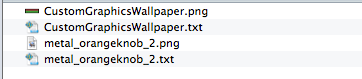
Save the rendered knob in the Resources/pictures folder. Like it was also the case with the wallpaper image file, you need to supply a text file, using the same name as the image, just replacing .png with .txt. If you are testing with the example knob I’ve attached above, the text file should be named metal_orangeknob_2.txt. Fill out the text file with the following:
Has Alpha Channel: yes
Number of Animations: 101
Horizontal Animation: no
Vertical Resizable: no
Horizontal Resizable: no
Fixed Top: 0
Fixed Bottom: 0
Fixed Left: 0
Fixed Right: 0
Did you notice how the file is supposed to end with an empty line? For some reason this is required, so do not miss it 🙂 Also, always make sure to save text files with UTF8 encoding and unix line breaks – that’s the safest options. It’s also best practice to avoid spaces and special characters in any filename – just stick to a-z, 0-9, dot . underscore _ and hyphen – and you should be safe.
Your pictures folder should now look something like this:
Extend the script
With the knob graphics in place, it’s time to extend the script. Kontakt has several built-in controls such as text displays, drop downs, buttons, knobs and sliders. Since there’s no such thing as a “custom graphic” controls, what we need to do is to add a slider, and then hide the slider’s own parts and add the picture we just saved. Below is the script you will need. Place it inside the on init / end on block of script1.
    { create the control - must be a slider }
    declare ui_slider $custom_pitch(-100, 100)

    { hide the slider parts }
    hide_part($custom_pitch,  $HIDE_PART_BG .or. $HIDE_PART_MOD_LIGHT .or. $HIDE_PART_TITLE .or. $HIDE_PART_VALUE)

    { assign the image file }
    set_control_par_str(get_ui_id($custom_pitch),  $CONTROL_PAR_PICTURE, "metal_orangeknob_2")

    { place it on the performance view }
    move_control_px($custom_pitch,  0, 0)

    { control how mouse movements should affect the control }
    set_control_par(get_ui_id($custom_pitch), $CONTROL_PAR_MOUSE_BEHAVIOUR, -500)
Save the script file and apply it again from the Script editor in Kontakt. It should make the instrument look like this:
Ok, we’re almost there. We just need to assign the button to some meaningful parameter in order to adjust the sound. Let’s say we would like to adjust the pitch of the first group of the instrument.
What we need is another block of code in the script. This will be fired when the knob is turned via the user interface, and it will change the pitch of the instrument:
on ui_control($custom_pitch)
    set_engine_par($ENGINE_PAR_TUNE, $custom_pitch , 0 , -1 , -1)

    if($custom_pitch < 500000)
        message("Pitch: " & -100 + $custom_pitch/5000)
    else
        message("Pitch: " & ($custom_pitch - 500000)/5000)
    end if
end on
This completes this tutorial on adding custom graphics to the Kontakt performance view. Please find all the necessary reference documentation in your Kontakt Documentation folder – there’s a whole manual just for KSP.
If you’d like a copy of the finished script along with the sample graphics and a bassdrum sample, you’ll find it all right here (requires Kontakt 4 or later): K4_NKI
I hope you found this tutorial useful. For my own part I found it very hard to gather all the little pieces of necessary information in order to be able to produce something like this.
I’d appreciate it if you send any comments or feedback to me via e-mail: henrik242@gmail.com
Thank you soooo much for this Tutorial, now i can do my own knobs in my futured works.
GREAT !
thanks man,
the tutorial helped me a lot!
do you have any idea if/ how it’s possible to keep the display beside an customized knob (which shows ..ms for example)
thanks in advice,
kai
Thanks so much for creating and posting this very well done tutorial along with the actual instrument. I learn best by looking at and into the examples of others and yours has been very helpful!
amazing, thanks a lot, should be more script tutorials like that one, thanks again for all
Thanks!!!!
Clearly explained, I´m saving this on my bookmarks :)))
I cant get thjis to work
This tut helped me a lot, thank you henrik!
Thanks a lot! Spent a whole day trying to find out why the PNG knob file wasn’t giving me the correct result: just because of a #@#$% blank line in .txt file
the first time that a person adds his contribution well explained everything I congratulate heart I hope that one day you can do something like this, but more complete with reverb attack would delay will be grateful
When you first drag and drop a sample into the Kontakt window, it will create a new Instrument where the sample is mapped across the entire keyboard. We need to change this for the original sample.
My knob(slider) picture doesnt move and isnt controlled by mouse. I used the exact code for the mouse behavior above.
Anyone konws why it isnt working? thanks
great tutorial.
did you remember the empty line in your .txt file for the knob image?
thanks 🙂 now it works
Nicee tutorial how can i change the size of the knob ?
And how to move the knob i only the the knob and the other frames ??
How can i change the size of the knob ?
I suggest you create the knob in the size you want it. Please check knobman for details on how to generate knobs.
Why don’t you make a tutorial on youtube i know for sure they gonna watch it!
For scripting, I tend to prefer written tutorials from which you can easily scroll back and forth and copy text. But thanks for your suggestion 🙂
Hey
My knob is working in the sense of mouse interaction but the frames move up vertically as I increase the value with my mouse?
Its almost as if the PNG isn’t being split into individual frames but more a long strip moving up on a vertical axis.
Any ideas?
I am not sure exactly what happens here, and how it happened. My immediate advice is that you double check that the txt-file that accompanies your png-file is correctly formatted and sets the correct number of frames.
I read somewhere Kontakt 5.6 changed maximum GUI size to 750x 1000y
is that true? And for future reference, where do you find such info? I searched the KSP manual but found no answers
Well, to be honest, I do not always keep up with the changes, but the manual should have a changelog, I suppose… Just took a look, and you are right. It’s not specifically mentioned, other than on page 134 as part of the description of the set_ui_width_px function 🙂
Hey this was incredible. I’ve successfully added a second knob, and now instead of having them apply to pitch, how can I apply them to instrument bus volumes (Bus 1 volume for the first knob and Bus 2 volume for the second)?